
I’ve often been asked by the parents of my drum students to provide some much needed TLC to their inexpensive or poor condition snare drums. As such, I’ve gotten relatively proficient at this sort of maintenance over the years and wanted to share it with you in these three steps:
First, make sure all of the hardware is securely fastened to the shell to prevent any rattles. Then replace both drum heads and install an upgraded pair of snare wires. Finally, ensure all parts are properly lubricated and tune the instrument properly.
In the following few sections, I’ll guide you through these steps in detail so as to remove the mystery of some of these steps. Even if you’re completely new at this, with a bit of practice and patience, you’ll be able to take on these tasks seemingly daunting tasks.
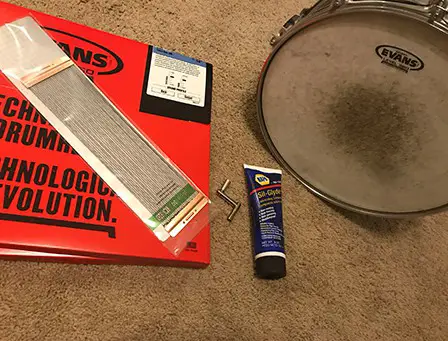
Supplies Needed For This Job: In order to follow these steps, you’ll want to assemble these items before you start:
- Drum Key
- Screw drivers (philips and flat heat)
- Needle nose pliers
- Replacement drum heads (see ‘Step 2’ below for details)
- Replacement snare wires (see ‘Step 4’ below for details)
- Light duty grease (Sil-Glyde from Napa Auto is great!) or Vaseline
- Drum tuner (optional)
Step 1: Check The Shell And Tighten All Of The Hardware
Start by removing the snare wires from the strainer and butt plate. This can usually be accomplished by turning the strainer off so the wires hang loosely and then loosening the screws (usually phillips head) which clamp the snare wire straps/strings in place.
Quick Tip
If you haven’t already purchased a replacement set of snare wires, this is a great time to check out their condition to see if you’ll need them. The wires which typically come with an inexpensive snare drum can be themselves quite cheaply made, in which case it’s probably worth replacing them anyway. After having removed the wires, check to see that none of them are snarled or severely misshapen. If they look ok and you’re on a super tight budget, you may decide not to replace them at all.
Check The Shell For Roundness: Before you move on to the next step, this is a good time to quickly check that the drum shell itself is “in-round” or that it hasn’t warped into some other shape than a perfect circle. The simplest way to do this is to flip it over so you’re looking at the bottom (which will usually have a clear head installed on it).
From this vantage point, you can compare the roundness of the shell, the drum head and the hoop. If any one of the three (but especially the shell) look to be more oval shaped, then you’ve likely got some serious issues for which you might need to enlist the help of a local drum builder/repair service. Definitely investigate further to try and find out exactly which part is out of round.
Drum Head Removal: Next, you’ll want to remove the old drum heads and check their condition. If they are obviously damaged or worn, don’t throw them out. There are a ton of uses for these old things including making your own o-rings and bass drum patches, or donate them to your local school band!
To remove your drum heads, use a drum key and loosen all of the tension rods (the 8 to 12 square headed screws) around the drum. While not critical, it is best to reduce tension evenly across the drum, especially at first if the head has been really cranked down on the drum. Once they are quite loose, use your fingers to back them out all the way (but keep them hanging in the hoop) and then lift the hoop off of the drum. Done!
Now that you’ve removed the snare wires and both drum heads, it’s inspection time. Start with a visual inspection of the inside. Is there anything obviously loose or amiss? Excess dirt and debris? If the latter is true – go ahead and give the inside a good cleaning. A slightly damp will usually do the trick (emphasis on slightly damp).
Tighten the hardware: For this step you’ll likely need a philips and/or a flat head screw driver as you are going to go around the inside of the drum and tighten all screws which hold the lugs, snare strainer and butt plate in place.
Important Tip: Don’t Over-Tighten!
DO NOT over-tighten the screws holding the hardware on to the shell. These typically have a locking washer on them, meaning that if they are tightened sufficiently, they’ll generally keep themselves from backing out. Over-tightening can cause damage to the hardware as well as a reduction of the shell’s resonance.
If your snare drum has an air vent with threads and a nut on it, go ahead and tighten it too. You might need your pair of pliers handy to grab the nut and turn it onto the vent. If your air vents are grommets, check their condition. If they are loose or damaged, you may want to replace them as they’ll likely be a source of rattling on the drum. While these are readily available for purchase online, installing them can be a tricky thing for which you might need to engage your local drum repair service.
Lube it up! While there aren’t many parts which require lubrication to function properly, doing so now can prevent problems down the road. There are essentially two places you’ll need to check for proper lubrication and apply a bit of light duty silicone grease (I’ve used Sil-Glyde from Napa Auto Parts for ages) or vaseline if necessary:
- Lugs/Tension Rods: If this is a brand new drum, this step is a MUST. You might as well do it if it’s a second hand drum too, as this will help you easily tune the drum, protect the threads of the lugs and help the drum hold its tuning (seems counterintuitive…I know). Completing this is quite simple:
- Take one of the tension rods and apply a small amount of grease to the end of it
- Insert this end into the lug and screw it in roughly 4-5 full revolutions
- Wipe up any excess grease with a rag
- Remove the tension rod and repeat until all lugs have been lubricated
- Snare Strainer: There are a few moving parts in this piece as it is responsible for mechanically lowering the snares from the drum head. There might be a cover on this part, which will necessitate its removal from the shell so that you can access it from the back side. Most strainers come from the factory already creased, however you’ll just want to check that there is still some grease on the innards of the strainer and apply more if needed.
Check The Bearing Edges: In this final step before re-assembly, you’ll want to check to make sure that the bearing edges of your drum are in good shape. Bearing edges are the top and bottom edge of the shell, which is usually tapered to a point or a round. This is where the drum head comes into contact with the shell and therefore must completely free of damage, perfectly round and flat if you’re looking at the drum from the side.
To check the edges, start by running your finger tip around the entire edge, feeling for any dings or gouges. Some smaller defects can be quite easily fixed with wood filler and sand paper. Bigger issues will likely need the attention of a local drum builder for repair.
As you’re checking the bottom edge of the snare drum, don’t be surprised by two roughly 2″-3″ long divots on either side where the strainer and butt plate are mounted. This is normal! These are called snare beds and allow the snare wires to vibrate freely once tensioned on the drum.
Finally, look at the drum from the side and ensure that the edges are perfectly flat (on the same plane). It is rare for warping so severe to occur that the edges don’t line up with each-other, but I’ve seen some strange things.
OK! Enough of this prep work. Let’s re-assemble this darn thing!
Step 2: Replace Both Drum Heads
I ALWAYS recommend putting fresh drum heads on a snare drum. If it’s used, I’m willing to bet that the heads on the drum are “well loved”. If the drum is brand new (but a budget friendly model), then it is safe to assume that the manufacturer selected the most inexpensive product they could find in order to keep their costs low.
As the primary resonator of the instrument, I can’t stress enough how vital this part of the equation is to having a good sounding instrument.
Drum Head Selection: There are A TON of choices on the market when it comes to drum heads. Experimenting with these heads can super frustrating for beginners, which is why we are not going to delve into this world today. For the sake of this article, we are going to go with standard selections which have been around for decades and have provided great results forever.
First things first though – the basics: Most snare drums are 14″ drums, meaning that the diameter from edge to edge is right at 14″. There are 13″ snare drums out there, as well as some other smaller/larger diameter drums but the vast majority will be 14″. This is the measurement you go off of when purchasing drum heads as well.
The majority of drums have two heads: a batter head (or top drum head) and a resonant head (or bottom head). For snare drums, this is especially important as the resonant head on this type of drum is an especially thin drum head which allows the snare wires to vibrate more freely. The resonant head of a snare drum is also commonly called a ‘snare side head’.
Again, there are a ton brands and models to choose from when it comes to these heads. My recommendation for replacements are pretty standard for the industry: this Evans 2-ply batter head and their Clear 300 Snare Side head. Easy!
Now, Let’s Put These Things On!
We won’t be fine tuning these heads just yet, but it’s important to remember that whatever you do – do it evenly. What I mean here is that you don’t want to crank down one side of the drum at a time. Instead, you will want to make sure that all tension rods are tightened in small increments, evenly around the drum in a specific ‘star pattern’. More on that in a bit though.
Quick Note Side Note: Bearing Edge Wax??
There are folks out there who swear by waxing the bearing edge of the drum prior to putting new heads on it. I’ve definitely done this, but admittedly haven’t noticed a huge difference in the performance of the instrument. If you’d like to try it…now is the time! Use a bit of beeswax and lightly rub it right on the bearing edge of the drum, making sure you have thin, even coverage.
I usually start with resonant heads, as it’s usually more practical to tune it up before installing the resonant head. This is my personal preference though. Whether you start at the top or bottom of the drum, you’ll follow these steps to get the drum head properly seated:
- Place the new head on the drum and make sure that it is round and that the metal ring of the head isn’t grossly out of round in relation to the shell.
- Logo Placement (i.e. where the head’s logo ends up in relation to the drum) is something which some drummers care an awful lot about. This is completely personal preference as it doesn’t matter sonically. The drum head’s logo however can be used as a quick reference point for setup so that you can place your drum quickly, based on where the logo is located.
- Hoop Installation is quite simple, especially if you’ve kept all of the tension rods in the hoop’s holes when you removed it. Simply place the hoop on top of the drum head, making sure you align the holes and tension rods with the top of each lug. IMPORTANT NOTE: The snare-side bottom hoop of the drum has cut-outs for the snares to pass through. Make sure that you install this hoop on the snare side and that when placing it, that the cutouts face the strainer and butt plate!
- Thread The Tension Rods into each lug just a few turns.
- Shake It! This would be a good time to pick the drum up and give it a few shakes. This odd procedure makes sure everything is loose and that nothing is bound up somewhere.
- Check Alignments: Make sure the hoop’s holes are centered over each lug and that the tension rods are properly threaded. This is a good time to double check that the snare-side hoop’s snare cutouts are in the right spot.
- Finger Tighten Each Tension Rod, but ONLY to the point where the washer is touching bot the screw head and the hoop. You don’t want to apply any tension at this point.
Next, we’ll dig into properly tuning the drum.
Step 4: Tune The Drum
First, I’d like to say that there are MANY methods for tuning drums and just as many opinions on how drums should be tuned. Snare drum tuning especially is such a flexible thing and really depends on your personal preference and the musical styles you’re playing.
That is why I have an entire section of this website devoted to tuning, where I already have and will continue to post a lot of great content about tuning and drum sounds.
OK, that said I want to focus here on the basic procedure you’re going to be following in order to get this things sounding great! Whatever head you started with in Step 3, you’ll continue with into this step before repeating Steps 3 and 4 for the other head.
The Star Pattern:
I mentioned earlier that the key to installing a drum head and tuning it up was to make small adjustments, evenly around the drum. The key to this is what’s known as the “Star Pattern”.
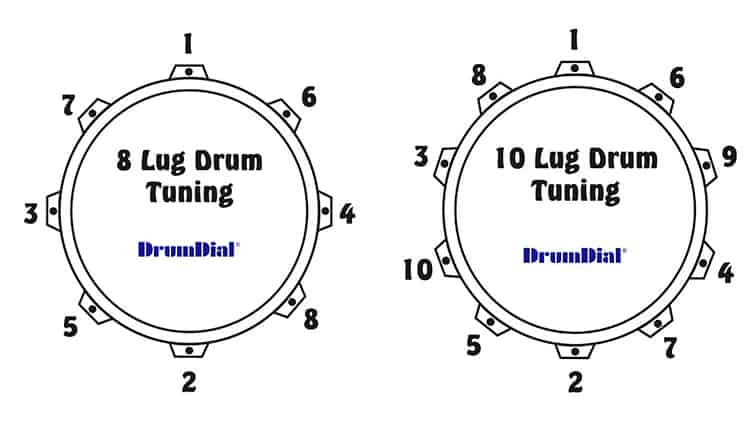
In this illustration, you’ll see the star patterns for 8 and 10 lug drums, as these tend to be the most common snare drum configurations. The procedure for tuning a drum involves making 1/4 to 1/2 clockwise turns on each tension rod at each sequential position of the pattern. Once you’ve completed one round, you can check the tuning and repeat as necessary.
What To Tune To?
A lot of folks ask me what pitch they should tune their snare drum to and my response is pretty invariably that they should be thinking about RESONANCE, NOT PITCH.
What I mean by this is that drums are made in different sizes with different materials and therefore have inherently different resonant frequencies. Tuning to a specific pitch/frequency for all of your snare drums makes no sense as no drum is created equal.
Instead, my preferred method of tuning a drum is to check the drum’s sound and resonance after every star pattern completion. If the drum sound ‘floppy’ or ‘wobbly’, I know that I still need to tune it up a bit more. If the drum sounds tight with a lot of high pitch overtone ring and little body, I know I’ve gone too far and I need to back off of the tuning a bit.
Quick Tip: Cracking Noises Are Normal
It is completely normal to hear slight cracking noises when you start putting tension on a brand new drum head. This is caused by the formed and glued edge of the drum head taking the shape of your bearing edge.
But regardless of if you need to tune up or tune down, you will always want to do it evenly across the entire head of the drum in the star pattern, making smaller adjustments as you get closer to the sound you want.
Fine Tuning:
Once you’ve gotten close to the sound and resonance that you’re after, you can start to fine tune the drum. At this point, you can also abandon the star pattern in favor of getting every lug/tension rod position to the same relative pitch.
To do this, grab your drum key or a drum stick and lightly tap the edge of the drum head by each tension rod position. It’s ok to go in a circular pattern for this. Your goal is to make the pitch of each tuning position the same. As you go around, make small adjustments at each tension rod location until all of them sound the same.
…aaaaand done!
Drum Head Seating
Brand new drum heads have a tendency to de-tune themselves after their initial tuning. The same phenomena is experienced with guitar strings as well.
To prevent this from happening, you’ll want to seat your drum head onto the shell. This has two benefits:
- It stretches the drum head out, limiting the amount of de-tuning you can expect after initial tune up.
- Seating a drum head helps the edges form to the contours of your shell’s bearing edges, helping the point of contact between head and shell to become uniform across the entire edge.
To seat the drum head, complete the initial tuning of the drum. You might even want to tune it a bit higher than you might normally. Next, place the drum down on a soft surface such as carpet so that the drum head you just put on is facing up.
Place both hands together and in the center of the new head, pretending that you are going to perform CPR on your snare drum. Then, with a fair amount of body weight, press down on the drum head 2-3 times.
You will likely hear the same type of crackling sound you heard while you were first tuning up the drum. Again, this is normal. Don’t be afraid to put a bit of weight into the drum. This just helps the seating process.
Caution:
Snare side heads are thinner and not quite as durable as batter side heads. Be a little more cautious when seating these heads. My recommendation is to not use the ‘CPR Method’, but instead use a few fingers and push down on the middle of the head.
Lastly, tune your drum up again as per the previously discussed method. This should put you in good shape and result in a decent sounding instrument.
TUNE – SEAT – TUNE
Just to summarize, you’ll first TUNE the head, then you’ll SEAT the head before giving it one final TUNE.
Step 4: Replace The Snare Wires
The last step in your cheap snare drum overhaul is to replace your snare wires. As mentioned in Step 1, it’s a good idea to check out the condition of the original wires when you first remove them from the drum.
If the wires look to be in good condition, you may decide not to replace them at all, which is fundamentally fine. That said, snare wires that usually come with inexpensive new drums are usually poorly made of cheap materials. This has a direct correlation to the sound quality you’ll be able to achieve for your new project!
If you really want to get the most out of your new toy though, my recommendation would be to spend ~$20 on a good set of wires from PureSound, which is one of the leaders in replacement wires. Don’t get too into the weeds on all of the options that exist though. I would go with a standard set of 24 or 30 strand wire.
Replacing the wires, whether new or old is the opposite process you followed in taking them off, with a couple of additions:
- Loosen the adjustment knob on the strainer by a few full turns (but not all the way). This ensures that you have plenty of room for adjustment down the road.
- Position the wires on the bottom drum head so that both ends are evenly spaced from the edge of the drum.
- Attach the wires to the butt plate by first feeding the strap through the port in the bottom hoop and into the butt plate. Tighten the screws on the butt plate to clamp the strap into place, making sure that the position of your snare wires doesn’t change substantially.
- Attach the wires to the strainer by the same process followed for the butt plate. Here’ you’ll want to pay special attention to the position of the strainer and length of your strap prior to clamping it down. I usually find that, having loosened the adjustment knob in step 1, that leaving the strainer in the ‘on’ position and clamping it down so that the wires are against the head but relatively loose does the trick.
- Fine Tuning: Flip the drum over and place it on a snare drum stand. Next, you’ll want to tighten the adjustment knob so that the snare wires have the right amount of tension against the resonant head. Play the drum with a stick in one hand while adjusting the knob with the other until you get the desired sound.
Quick Tip
A lot of beginners tend to over-tighten their snare wires because they want to match the snare sound of their favorite record. It is important to understand that drums recorded in the studio have a lot of audio wizardry applied to them and therefore sound much different than live drums. If the snares are a bit too ‘buzzy’ for you, try running a small strip of electrical tape over one end of the wires (taped to the head itself) instead of tightening the crud out of the wires. This will still give you the resonance of the drum and the wires.
Related Articles and Video
Well, there you have it. I hope I’ve been able to provide you with some good tips on how to make that $30 drum of yours sound like a million bucks!
12 Tips to Make Drums Sound Better:
This general article contains useful tips (some of which have been used here) in order to improve the general sound of an inexpensive drum set.
Building Your Own Drums:
If you want to take your drum building / refurbishing skills to the next level, I wrote a full article on how to build your own drums, in which I go into detail about the planning, sourcing and assembly of any drum you could imaigine.
YouTube Video:
I took some time and recorded a YouTube video all about this exact topic. Click on the image below to view it!
Related Questions
What pitch should a snare drum be tuned to?
It is always best to tune a drum to where it is resonating naturally. While drums can certainly be tuned to a specific pitch, there is no pitch that can (or should) be identified to tune a snare drum to as different drum sizes and materials will all impact how the drum will sound.
How to make toms sound better? A lot of the same principles used on snare drums for this article apply directly to toms as well, with the obvious exception being the replacement of snare wires as toms do not generally have them. Various muffling techniques can help you to achieve the tom sound you desire.