

I spent a few years working for a drum parts supplier based in Nashville. The shop sold (and still sells) all of the parts and supplies needed to build custom drums: shells, lugs, drum heads, etc. – either in raw format or partially assembled. It was through this experience that I came to fully understand what’s involved in building drums and so I wanted to share the process with you.
After some initial planning, you’ll need to select and acquire your drum shells, hardware heads and any other tools you might need. Once you have what you need, it is then time to apply the finish of your choice to the drum shells before assembling all of the hardware. Then install and tune some drum heads and you’re in business.
Of course, there is a lot more detail to it. The whole process from start to finish can be extremely exciting, but also overwhelming and requires you to be methodical and to have a lot of patience. In this article I am going to talk you through all of the steps necessary to assemble your own high-quality drum kit in three phases:
- PHASE I: Planning
- PHASE II: Sourcing
- PHASE III: Assembly
As we move through these phases, I will also provide you with practical tips, options and potential pitfalls along the way so that you can make the best decisions for yourself and your comfort level.
…and after the last tension rod has been tightened and you play your first note, you’ll have the extra added satisfaction of having built the drums yourself, which is a pretty awesome experience.
FREE PDF QUICK GUIDE TO BUILDING YOUR OWN DRUM KIT:
Before we dig right in, I wanted to let you know that at the end of this article, you can download a free quick guide which will outline all of the topics in this article on one, easy-to-follow document. You’ll want to refer back to this article for the details, but the quick guide will be your guidepost as you continue through the process of building out an awesome kit.
Why Build Your Own Kit?
A lot of people will tell you that building your own drum set is a great way to acquire a top quality drum set at a fraction of the cost. This definitely can be true, though if you get crazy with the options, you’ll definitely find your budget slowly expanding.
Beyond cost savings, there is an intimacy that is formed with an instrument which you have assembled yourself. That is something you definitely can’t get from a store bought kit. You will have inspected all aspects of your shells, applied the drum’s finish and installed every piece of hardware, which is a pretty cool experience.
Lastly, if you are very particular about the design, size and function of your drums, designing and assembling your own kit ensures that you can get exactly the kit you want, right down to your exacting specification.
PHASE I: PLANNING
Before getting carried away filling online shopping carts with stuff you may or may not need, it is very important to start the building process by spending some time nailing down a few key decisions around the design, layout, desired sonic characteristics and hardware options of your new baby.
TOP TIP:
Go to the websites of various drum parts retailers out there and get a feel for what type of hardware is available. You’ll also find that the staff at these places are usually more than happy to spend some quality phone time with you discussing your options. This is a great way to educate yourself as you are planning your new kit out.There are a few sites to consider, but these are by far not the only ones that sell drum parts:
By spending time planning NOW, you will save yourself from some very common mistakes, as well as ordering things you may not actually need and spending more money than necessary.
Visual Design Considerations
Having a very clear sense early in the process of the design, color scheme and general ‘look’ you are going for will really help you make the proper decisions along the way. The following are some items to consider:
IMITATION IS THE BEST FLATTERY:
Is there a specific kit you’re trying to emulate? Maybe Lars’ black and white kit from the 90’s – or Neil Peart’s most recent kit – or Ringo’s famous Ludwig kit? If so, I like to find pictures you can use for inspiration and actually print them out – probably because I’m old school and like to have paper in my hands.
COLOR PALETTE:
What colors do you gravitate towards? You should ask yourself this question for the color of the shells themselves, but ALSO the hardware as powder coating lugs and hoops to a specific color is a well trodden (albeit expensive) path. Especially when it comes to the shells, the color and finish you are after will dictate whether the shells are covered, painted or lacquered.
Most online retailers that deal in drum wrap have sample sets available, which might be a good thing to order in case you are stuck on this decision.
LUG SHAPE:
Is there a specific lug shape that you like (i.e. DW/George Way style, tear drop, vintage Slingerland, etc.)? The shape and style of your lugs is typically a great place to start the design process as they will influence the rest of your hardware selection choices, but also the finish of the drums themselves.
Drum Kit Configuration
For some, this is probably the easiest consideration in the whole process – for others it may be the most difficult. Are you looking for a single snare drum? A four-piece kit? A nine-piece kit?
Cost definitely plays a role in the decision of the type of layout to go for here, but the beauty of building the kit yourself is that in controlling the shells and hardware you are putting on the drum – you’ll quite easily be able to replicate the process if you decide to start small and add more drums to the kit later as funds permit.
Sonic Goals
This is probably a self-explanatory topic, but worth covering nonetheless as it has big ramifications on the specifications of your shells. Fundamentally speaking, the question of sonic qualities comes down to how you plan on using this kit.
Are you playing a bunch of rock and metal gigs? You’re probably going to want to go for larger size shells overall. Is jazz or afro-cuban your jam? Smaller shells it is. Are you looking for a versatile kit that can suit a variety of needs? Perhaps a variety of different drums in the kit will help you to diversify your sonic options.
The point here is this: spend some time really thinking about the size of your drums before spending any money, which is a perfect segue into the next section on shells.
Shell Options
Once you’ve had a chance to think about how you will be using this kit and your overall sonic goals, you can start to define the type and size shell you want to order.
Shell Sizes:
As we’ve discussed – the style of music you play will largely dictate the size and quantity of drums you will want to order. COST is an important consideration here as larger drums will cost more to put together than smaller drums. For example, shells for a four-piece ‘fusion’ kit with an 18″ kick and shallow toms will likely cost a few hundred dollars less than a four-piece, Dave Grohl-style rock kit with a 24″ kick and massive toms.
Shell Materials:
By far, the most common shell type on the market are maple shells as they tend to be the most resonant and associated with high quality kits. Keller shells is by far the most well known manufacturer of wooden shells and they are readily available via a variety of online stores.

Maple is definitely not the only type of wood shells available as birch and mahogany are also quite popular, and usually less expensive. There are also suppliers of exotic wood drum shells out on the market if you have an itch for a more unique look.
Acrylic shells are also still available, though their popularity has faded since the 70’s. These shells tend to be quite fragile and require special care during manufacturing and drilling to handle – so there are far fewer options for sourcing these online.
Metal snare drums are also quite popular, with brass and steel shell options leading the pack, though I’ve also seen aluminum shells from time to time. Metal toms and bass drums are extremely rare and likely cost prohibitive.
Where materials options go really crazy are with snare drums as there are all sorts of options. You can go with standard Keller maple shells of course, but there are all sorts of companies out there who create solid wood shells, stave shells, crazy high-ply laminated shells, etc. If this is your first kit, my recommendation would be to match the kit with your snare, because you can always go crazy with a custom snare later!
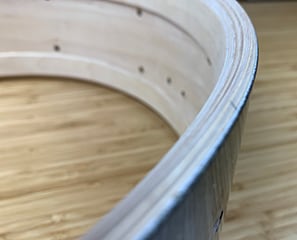
Reinforcement Rings:
Largely used for heavy use kits and/or high tension kits, rings are installed on the top and bottom bearing edges of a drum and provide the shells with more stability and durability. They do reduce the resonance of the shell a bit as it is more material which needs to be sonically ‘excited’.
The shell used for the pictures in this article has reinforcement rings installed if you’re curious what they look like.
To Wrap or Not to Wrap, That is the Question:
When deciding on the finish of a drum kit, there are generally two paths you can go down: a paint or lacquered finish or a covered finish (also called a wrap). Both have their benefits and drawbacks, but ultimately – the decision could be a fairly simple one based on the visual characteristics you are going for.

Covering a drum essentially means that a thin sheet of drum wrap/cover (available in tons of different colors and patterns) is glued to the outside of the drum shell prior to holes being drilled and bearing edges being cut. The huge benefit here is that you can achieve all sorts of great finishes without having to mess with expensive painting processes – sparkle, oyster pearl, flat colors, etc. The main drawback is that the additional material does negatively affect the resonance of the shell itself, though admittedly it is a minimal impact.
Lacquer finishes are ideal if you want the wood grain of your shell to be featured as part of your finish. By far the most common is a natural finish, though you can buy lacquer in all sorts of colors as well. This type of finish typically consists of several coats of lacquer followed by a few coats of clear coat to protect the finish.
Paint finishes are by far the most expensive and premium as it involves a lot of labor and experience to do it correctly. There are few drawbacks to a pain finish other than cost, but the results usually look amazing and also preserve the sonic resonance of a particular shell.
Mounting Options
Before ordering shells and hardware, you are also going to want to identify how you want to mount these drums, as you’ll need to ensure that these considerations are reflected in your hardware order.
When it comes to mounting hang or rack toms, there are two fundamental options.
- Bracket mounts are what I’ll call a ‘traditional’ mount where a bracket is fastened to the side of the drum into which a tom arm can be inserted and the drum is clamped on to. This type of suspension is decreasing in popularity as it is quite intrusive to the drum, reduces resonance and requires more drilling into the shell.
- Suspension mounts are made in various flavors, but typically mount the drum using the lugs or tension rods on the outside of the drum in order to ‘suspend’ the drum without having to drill into it.
Similarly with floor toms, the traditional method of mounting includes three brackets for floor tom legs. That said, suspension mounts are also readily available for these larger drums.
Whichever options you end up going with, you’ll want to make sure that your hardware list takes your preference into account.
In the free PDF Quick Guide to Building Your Own Drum Kit (scroll down to the bottom to get it), I’ve listed out some of the major players in the United States for sourcing drum parts. This list won’t include wholesale options, which is another thing all together.
PHASE II: SOURCING YOUR PARTS
OK! You’ve planned your kit out, researched your options and gotten a good handle on what you need to get going. Now comes the fun part: shopping.
Start By Making A Rock Solid List
I know this sounds simple, but my recommendation would be to keep a rock solid list of items you need to source, where you plan to get them from and how much they cost.
To make this step easy, I’ve created a simple spreadsheet template that you can download and use for your own project. The template will even calculate out the total cost of your new baby and let you keep track of part numbers to make ordering easy. I have pre-populated the template as if I was building a 3 piece shell pack, just to give you an example of how to use it.

By creating this rock solid list, you are making your purchasing much easier by knowing exactly where you’re getting what and how much it will cost.
Component and Service Descriptions
In this section, I’d like to give you an overview of each component you’ll be ordering, as well as a rundown of some things you’ll want to pay special attention to as you start to source and assemble your kit.
Additionally, I’ll describe some of the services that are available from most shell suppliers so that you can decide how much of the delicate shell building activities you want to handle on your own vs. having them done for you.
Drum Shells:
No matter what type of shell you go with, you are likely going to require your vendor to do some work on them for you. Especially in the case of Keller shells, they come from the factory in long tubes which means that at the very least, you’ll want to have your supplier cut the shell down to the right size for you.
For example, if you’re building a 14×14 floor tom, the tube that comes from Keller is much longer than the desired 14″ depth, so it will need to be cut down.
Shell Bearing Edge, Layout and Drilling Services
Are you a woodworker? Do you have a bunch of tools, including a router table? These are the questions you’ll need to ask yourself for this next item because a lot of folks (myself included) don’t have a ton of specialized tooling required to cut bearing edges into the shells, much less create super accurate snare beds.
Especially if this is your first time building a kit, I would highly recommend having your shell supplier do some, if not all of the following for you:
Bearing Edges:
Most shops will have several options for cutting bearing edges, depending on what type of sound you’re going for. Vintage rounded edges? Modern sharp edges? They can steer you in the right direction.
Layout:
In order to know where you need to drill for your lugs, air vents, mounting brackets and snare hardware – a layout and marking of all the necessary holes will need to be performed.

Drilling:
Using the aforementioned layout, drilling for all of the hardware needs to take place. This is probably the one step in the whole process with the highest ‘pucker factor’ – as one mistake will ruin the drum, or at least make it more like swiss cheese.
Reinforcement Rings:
Another common option you can order through most vendors is the installation of additional plys of shell on the inside of one or both of the bearing edges, giving the shell a more rigid structure for high tension tuning and also producing a ‘thuddier’ tone.

Wrapping:
Installing wrap on a drum is a tricky task. The material needs to be cut just right, the glue needs to be applied just so and the wrap needs to be wrapped perfectly. The dangers of not doing this right are eventual de-lamination of the wrap from the shell, as well as a rippled finish. Of all of the items that need to be done to assemble a finished drum, this is probably the one which truly requires a craftsman’s touch. Paint and lacquer are a different animal and can likely be tackled by the DIYer.
Snare Beds:
If you are building a snare drum, snare beds will need to be cut into the bottom bearing edge of the drum on opposite sides where the strainer and butt plate are to be mounted. These are slight bevels cut into the edge which allow the snare wires to vibrate freely.

TOP TIP:
If the vendor you are using for shell layout and drilling services does not stock a specific piece of hardware you want added to the drum, you might be required to ship that piece of hardware to the vendor so that they can perform a proper layout for you.
Bass Drum Hoops
Bass drum hoops are most commonly wooden, although metal and plastic hoops exist on the market as well. Hoops are ordered in the same diameter as the bass drum shell, though their actual diameter is actually larger than the drum to properly fit the bass drum head.
One very popular option for wooden bass drum hoops is the addition of an inlay of drum covering into the outside center of the hoop so that it matches the covering of the rest of the kit. This is an additional service your shell vendor should be able to do for you.
Lugs
Lugs come in a huge variety of shapes, sizes, colors and configurations. Here are a few considerations to keep in mind:

- Bass drum lugs are typically larger than tom lugs. This is because they need to be higher up off of the shell to accommodate for bass drum hoops and claws.
- Hole spacing of the mounting holes is an important factor when considering the drilling layout to ensure the lug fits on the drum
- Single ended lugs are typically for toms and bass drums, whereas double ended lugs are usually for snare drums – though that’s not a hard and fast rule.
Lug Screws

These are commonly overlooked but necessary as they are the screws which mount the lug to the shell itself. Special attention needs to be paid to their length as the thicker shells you have the longer these screws will need to be. For the most part, the threading on these screws is all the same, though a few annoying exceptions do exist however this is rare and you likely won’t encounter this.
Gaskets
All metal drum hardware typically has a plastic or felt gasket associated with them. This serves the purpose of separating the bare metal from the shell itself which helps to protect the surface of the shell and reduces metal vibration.
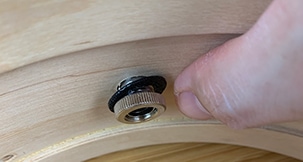
Air Vents or Grommets

Also commonly overlooked are the vents which allow air to freely escape the drum when it is played. These are vital because without them, air would be trapped inside the drum resulting in poor tone and lack of playability.
These vents are typically a screw on pieces for which holes need to be drilled. Older, vintage-style drums used grommets which are crimped into place. These are also still readily available if you’re looking for a more vintage look.
Hoops
There are a few different ‘flavors’ of drum hoops which I will detail here, all of which add to the aesthetic, functionality and tonality of a drum in different ways:
- Single Flanged: Single flanged hoops are a throwback to the early part of the 20th century and provide a cool vintage look. They require claw hooks (much like small bass drum claws) in order to pull the hoop down over the flesh hoop of the drum head.
- Triple Flanged: This is BY FAR the most widely used hoop out there and is essentially what you’ll see installed on 90% of the drums out on the market. They have three flanges (hence the name) which provide a fair amount of rigidity for every day use.
- Stick Saver: Vintage Slingerland drums popularized these hoops, which are essentially triple flanged hoops with the top flanged inward, creating a cool smooth look. While these do help in saving your sticks if you are a heavy rim shot player, the aesthetics of these are probably their biggest draw.
- Die Cast: These hoops are usually made of cast aluminum or steel and are the most rigid and high strength hoops you can find on the market. They are found most commonly on snare drums (especially marching percussion), though you’ll find them used on high-end kits quite often.
IMPORTANT: If you are building a snare drum, make sure one of your hoops is a ‘snare side’ hoop, which features a cutout on opposite sides for the snare wires to pass through.
So – now that you’ve decided on your hoop, you can order a set for every drum you plan on building.
For that super custom look, you might consider having your hoops powder coated a certain color to match the finish of your drums. This can get pretty expensive, and if done improperly can also impede with the hoop’s functionality. Your selected vendor should be able to help you with this though.
Tension Rods (toms and bass drums)
Lucky for us, the industry has long since adopted a standard thread size for tension rods, which makes this a much easier purchase than it would otherwise be. The only real question when it comes to this purchase is tension rod length.

This is going to be directly influenced by the placement of the lug on the drum in relation to the bearing edge. The further away from the edge the lug sits, the longer the tension rod will need to be. It is fairly standard to find 1 5/8″ or 2″ rods installed on a drum, but this is something which you can specifically design for. If you like a really tight look, you can place your lugs with shorter tension rods in mind and vice versa.
TOP TIP:
Though tension rods typically come with a metal washer, make sure that you order nylon washers for each of your tension rods as well if that’s a look/feel you’re going for.
Bass drums typically require a long tension rod to account for the distance from the bass drum claw, hoop, head and lug. It is most common to see bass drum lugs laid out to accommodate at 4 1/4″ tension rod.
Bass Drum Claws
Speaking of bass drum tension rods, one item you’ll need to complete your bass drum are the claws which clamp onto the front of the bass drum hoop at each lug location. The tension rod is threaded through the claw and then into the lug. Once tightened, the claw provides downward pressure onto the bass drum hoop, which in turn puts tension on the drum head.
There are a large variety of claw styles available on the market, so make sure you have a look at your options and pick one which aesthetically matches what you’re going for.
Bass Drum Spurs / Legs
Your new bass drum will need legs. There are only a few options out there, but identifying which spur you want to go with will be important for layout and drilling purposes.
Tom Mounts
Similar to bass drum spurs, there are a variety of options out there and you’ll need to select the direction you want to go so that your shells can be properly drilled.
If you are going with a tom suspension system which doesn’t require any shell drilling, then you have a bit more time to solidify this decision.
Floor Tom Brackets and Legs
The most common way of mounting a floor tom is via three brackets and legs, which will need to be drilled for. There are suspension systems which require no drilling out there, which is an option you can explore.
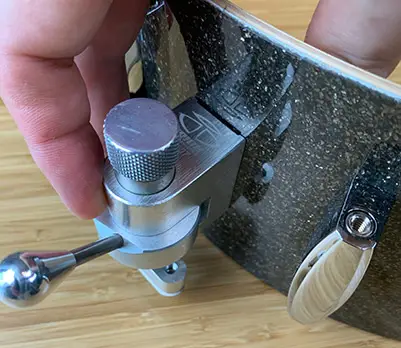
Snare Strainer and Butt Plate

If you are building a snare drum, you’ll want to select the strainer (throwoff) and butt plate to be included on the drum. Especially if you are building a shallow / piccolo snare drum, you’ll be somewhat limited in choices and layout will need to be carefully performed in order for the snares to make proper contact with the bottom head.
Snare Wires
Wires come in many different flavors, designs, price ranges, materials and strand counts. It can certainly be overwhelming. Most vendors should be able to advise you on the best wire for your desired sound. The good news here is that this is one of the least permanent aspects of your new build so if you are unsatisfied with your snares down the road, it’s not big deal to swap them out.

Drum Finishes and Covering
If you have decided to wrap your drums in drum covering, there are vendors that can supply and even pre-cut the wrap for you. Some installation methods call for double sided 3M tape, though this is usually a sub-standard installation method. Usually some sort of adhesive should be used and can also be sourced from your vendor.
Rule of thumb with covering: if you are at all unsure of doing this yourself, have your vendor do it for you as they have well practiced craftsmen (and women) who can knock this out for you.
If you’ve decided to lacquer and/or stain your new shells – there are all sorts of options available as well. Your vendor can guide you as to their recommendations.
Recommended Vendors
Finding various online suppliers is an activity that you’ll likely be partaking in starting with the planning process, as a fair amount of internet research is necessary in order to really hone in on the options that exist out there.
Suffice it to say, there is no shortage of options in the market for where to go to buy drum parts online – and every company will have similar stock on some things, but also specialize in certain areas. A lot of it is going to come down to matching a supplier with your general needs. It may also turn out that you’ll look at several sources for different parts and materials.
I have not been paid, asked to recommend or been influenced to call any of these folks out specifically, but felt it was my duty as part of this resource to list out a few of the online vendors available to help you source your new project and provide you with guidance on their products.
SIDE NOTE:
The majority of online retailers source most of their parts from the same supplier, WorldMax USA. They are a wholesale drum parts import business based out of Nashville run by a great husband and wife team, Rob & Maggie Kampa. Rob is a master drum builder himself who built drums as Magstar – I’ve got a few of his snares which sound phenomenal. The point is this: catalogues from one vendor to the next are going to look VERY similar because the majority of the parts they carry come from the same source – WorldMax.
So – in Alphabetical order and with a light description, here are a few companies/vendors you can approach and do your research with:
- Drum Factory Direct – I’ve never purchased anything here, but looking at their online selection, it seems they stock a lot of parts, though navigation of the site leaves a lot to be desired.
- Drum Supply House – based in Nashville and the shop I used to work for. Andy and the gang have an eye for vintage projects, but carry all the parts necessary for pretty much any build, modern or old. They have a full shell shop as well.
- Precision Drum Company is a family run outfit that not only supplies drum shells, hardware and covering to builders, but also build their own kits in-house as well! They are known for tackling very difficult and unique custom drum builds.
There are more players in this game, however these are the major ones worth checking out in your search. My recommendation is to check each one of them out, try to learn as much from their websites as possible, pick the one you feel most comfortable with and go to town!
TOP TIP:
Don’t forget to use the free spreadsheet parts list template
PHASE III: ASSEMBLY
It’s been quite a journey to get to this point, but you made it! You’re finally ready to assemble the collection of parts into a fully cohesive drum kit.
Be methodical:
It’s easy to just rip into all the boxes as they arrive and start screwing stuff together, but that is a sure fire way to lose parts and damage some things. My recommendation as you get ready to put your kit together is to be deliberate and take the process on nice and slowly.

NOTE:
For the sake of this article, I am going to assume that you’ve had your bearing edges cut and that your shells are laid out and drilled from the vendor. I’ll look to creating separate resources for you if that is not the case and you’ve decided to tackle this all by yourself.
Inventory
One of the first things you’ll want to do after your shipment arrives is to take stock of everything and make sure you aren’t missing anything. There is NOTHING worse in this process than realizing you’re missing something that either should have been in the shipment and wasn’t or you didn’t order.
Use the list you made in your planning process to cross reference what you got. You can also use your online order receipt and/or the packing slip with your shipment.
Quality Control
The next thing you’ll want to do is to inspect all of the parts you received to ensure they were not damaged in shipping or are defective.
For shells, you are going to want to carefully check the bearing edges for any dimples or damage. The edge should be sharp and crisp. One recommendation is to gently set the shell down on a surface which you know is completely flat. The bearing edge should make solid contact with the surface all the way around the drum. If it doesn’t, you’ve likely got some warping issues or damage to deal with.
For hardware, you’ll want to inspect things like the quality of the chrome, that there are no lug inserts missing and that screws thread perfectly.
Once everything checks out – you’re ready to start putting stuff together!
Required Tools
The tools list for assembling a kit are pretty minimal:

- Drum Key (goes without saying)
- Screw driver (phillips head is most common for lug screws, though I have seen some with an allen head)
- Pliers – you’ll likely need this to tighten the air vent or pull snare wire straps
- A shop rag – you just never know.
- (Optional) You can use an electric screw driver for the above, however please ensure that you are careful and set low torque settings to avoid damaging your lug screws.
- (Optional) Loctite – if you want to prevent screws from backing out over time, some folks use a bit of loctite on the mounting screws (not the tension rods).
- (Optional) Grease for tension rods, if you’re into that sort of thing. I like to use Sil-Glyde, but most silicon lubricants will do the trick.
STEP 1: Attach the Lugs
Using the lug screws you purchased, you’ll want to first attach the lugs to the drum, making sure you place a grommet behind each lug. When tightening the screws, I recommend securing them with enough force so that they are solid, but take care not to over-tighten anything as it can damage the hardware and also reduce your drum’s resonance.

It can be tempting to use an electric screw gun for this process, and plenty of folks do. If this is your first project though, I would recommend just using a plain ole’ screw drive so that you can feel what you are doing more easily.
An option during this step is to use a small amount of Loctite on each lug screw to prevent them from backing out over time. This is definitely not required but especially if the kit is going to be heavily used and played a lot, it might be worthwhile.
STEP 2: Attach any Brackets, Spurs, Snare Parts and Air Vents
Once the lugs are secured, any other bracketry and vents you are mounting on the drum should also be secured using the same guidelines I laid out above. Each part should have a grommet with it (either included or bought separately).
STEP 3: Heads, Hoops & Tuning
Once all of the hardware is attached to the shell, you’ll want to give everything a once over just to make sure things look aligned as this will be your last opportunity to tighten things up.
At this point, you are ready to slap your new drum heads on each drum, get the hoops seated over the head and start the process of threading tension rods for tuning.

To Lubricate or Not To Lubricate…That is the Question!
A lot of builders like to put just a bit of silicone lubricant on the end of their tension rods before threading them into the lug, but this is a very polarizing issue.
Proponents say that the lubricant reduces friction on the tension rod going into the lug and therefore makes it easier to feel the resistance of the tension rod as you are tuning it.
Detractors say that the lubricant makes it easier for tensions rods to back themselves out of the lug more quickly and causing quick detuning.
My opinion:
Add a bit of lube. You can always install lug locks onto the tension rod to prevent de-tuning and the lubricant will make tuning the drum easier.

Use your typical method of tuning a drum. This is no different than tuning any other drum you have in your collection. It’s incredibly exciting to hear your new creation come to life right in front of your eyes.
Now that you’ve been through the entire process with me in this article, it’s time to get busy. To make it easy, I created this PDF quick guide which I’d love for you to have and use as a guide throughout the entire process of designing and building your kit!
Free PDF Quick Guide to Building Your Own Drum Kit
Related Video
I created a video about restoring a cheap snare drum to make it sound great! In the video, I cover a lot of additional assembly details, as well as some tuning tips.
You did it!
Your baby is now whole and complete. It is quite a sense of accomplishment building your own drums and I think that at the end of this process you’ll agree with me that building your own kit is not necessarily just about cost savings, but more about the intimacy it creates with the instrument of your creativity.
This is surely a kit that will stand out in your collection. While it may seem like a ‘No Name Kit’ to an onlooker, to you this kit IS EVERYTHING!
Related Questions
How do you make a homemade drum kit? Any cylindrical object, or even square boxes can be used to emulate drums in varying sizes. Building a legitimate homemade kit without the benefit of parts and manufactured shells is incredibly hard, however there are all sorts of approaches if you are considering a more non-traditional route.
How do you make a portable drum kit? Focus on smaller drum sizes that don’t weigh a ton and can be easily carried around. Build drums that can be nested inside of each other for transport. If done right, this should allow you to carry your entire kit around with you in one trip to the car instead of several.